Rheem Hot Water Troubleshooting
Cold showers are nobody’s idea of a good morning. When your Rheem hot water heater stops delivering, the instinct is to call a plumber straight away. But a surprising number of common issues, from a tripped breaker to sediment buildup, are things you can resolve yourself with the right approach. This Rheem hot water heater troubleshooting guide walks you through every step, from safety checks to error codes, so you can diagnose the problem confidently, fix what you can, and know exactly when it’s time to call in the professionals.
Table of Contents
- Key takeaways
- Before you start: safety and preparation
- Fixing no hot water or not enough hot water
- Understanding Rheem error codes and warning signs
- Routine maintenance to prevent problems
- Repair or replace: how to decide
- My honest take on Rheem troubleshooting
- Need a hand with your Rheem hot water system?
- FAQ
Key takeaways
| Point | Details |
|---|---|
| Safety comes first | Always isolate power or gas before inspecting your Rheem hot water heater. |
| Document before you act | Photograph leaks, corrosion, and model details to speed up any professional service call. |
| Sediment is a silent culprit | Regular flushing prevents the noise, inefficiency, and element burnout that sediment causes. |
| Error codes guide your response | Rheem trouble codes tell you whether a DIY fix is appropriate or a technician is needed. |
| Know when to replace | Heaters older than 10 years with recurring faults are often cheaper to replace than repair. |
Before you start: safety and preparation
Jumping straight into troubleshooting without preparation is how small problems become expensive ones. Take five minutes to do this properly.
Switch off the power or gas supply first. For electric Rheem models, locate the dedicated circuit breaker in your switchboard and turn it off. For gas models, turn the gas control valve to the “pilot” or “off” position. Never work on a live unit.

Locate your model and serial number. These are printed on the rating plate, usually found on the front or side of the tank. Write them down. You will need them if you contact Rheem support, order parts, or check your warranty status.
Gather your tools before you begin. A basic Rheem troubleshooting kit should include:
- A multimeter (for testing elements and thermostats on electric models)
- A flathead and Phillips screwdriver
- A garden hose for draining sediment
- A torch or headlamp for inspecting tight spaces
- A camera or phone for documentation
Photograph everything visible. Clear visual documentation helps plumbers bring the correct tools and diagnose faster, reducing service times and call-out costs. Snap photos of any corrosion, water stains, or pooling around the base of the unit.
| Preparation step | What to check |
|---|---|
| Power/gas isolation | Breaker off or gas valve to pilot/off position |
| Model identification | Rating plate: model number, serial number, manufacture date |
| Tool readiness | Multimeter, screwdrivers, hose, torch |
| Visual documentation | Photos of leaks, rust, discolouration, and unit surroundings |
| Gas/electrical supply | Confirm gas meter is on; check switchboard for tripped breakers |
Pro Tip: Take a photo of the full rating plate on your Rheem unit and save it in your phone’s notes app. You will have every detail on hand the moment a technician asks for it.
Fixing no hot water or not enough hot water
This is the most common complaint we hear. The cause depends on whether your unit is electric or gas, but the diagnostic process follows a logical sequence.
Step-by-step diagnosis
- Check the thermostat setting. The recommended temperature for most Australian households is 60°C to prevent legionella growth. If someone has accidentally turned it down, this is your fix.
- Reset the circuit breaker. For electric models, go to your switchboard, find the hot water circuit, switch it fully off, wait 30 seconds, then switch it back on. A tripped breaker is one of the most overlooked causes of no hot water.
- Relight the pilot on gas models. Turn the gas control knob to “pilot,” depress the reset button, and light the pilot flame. Hold the reset button for a full 60 seconds after ignition to properly heat the thermocouple and allow steady gas flow to establish.
- Test the heating elements. On electric models, use a multimeter set to resistance (ohms). A functioning element typically reads between 10 and 30 ohms. A reading of zero or infinity indicates a failed element that needs replacing.
- Inspect thermostat contact. Thermostat separation from the tank surface causes misreading and overheating, leading to premature element failure. Press the thermostat firmly against the tank wall and check that the bracket holds it flush.
- Flush sediment from the tank. Connect a garden hose to the drain valve, run it to a suitable drain point, and open the valve. For heavy buildup, use the pulse flush technique, which alternates draining with short bursts of cold water to dislodge compacted mineral layers more effectively than a simple drain and refill.
| Symptom | Likely cause | DIY fix |
|---|---|---|
| No hot water (electric) | Tripped breaker or failed element | Reset breaker; test and replace element |
| No hot water (gas) | Pilot light out or faulty thermocouple | Relight pilot; hold reset for 60 seconds |
| Lukewarm water | Low thermostat setting or sediment buildup | Adjust thermostat; flush tank |
| Slow recovery | Sediment insulating heating element | Pulse flush tank; check element resistance |
| Overheating | Thermostat misalignment or faulty high-limit switch | Reposition thermostat; reset high-limit button |
Pro Tip: When flushing your tank, let the water run into a bucket first so you can see how much sediment is coming out. If the water runs clear within a minute, the tank is reasonably clean. If it stays murky for several minutes, schedule a full flush and consider a professional inspection.
Understanding Rheem error codes and warning signs
Modern Rheem hot water heaters with electronic controls display fault codes on the control panel. These Rheem water heater troubleshooting codes are your first clue about what is wrong and how serious it is.
Common Rheem water heater trouble codes include:
- Fault 1 (or E1): Ignition failure. The unit attempted to light but could not establish a flame. Check gas supply and pilot assembly.
- Fault 2 (or E2): Flame loss during operation. Often caused by a dirty or failing thermocouple. Clean or replace the thermocouple.
- Fault 5 (or E5): Temperature sensor fault. The sensor may be disconnected or faulty. This typically requires a technician.
- Fault 6 (or E6): Overheat or high-limit trip. The unit has shut down to prevent damage. Reset the high-limit button after the unit cools, but investigate the root cause.
- Fault 9 (or E9): Gas valve fault. Do not attempt DIY repair. Call a licensed gas fitter.
For persistent error codes, gas smells, or active leaks from the tank body require immediate professional attention.
Beyond the display codes, some warning signs should stop you in your tracks:
- A strong smell of gas near the unit
- Water pooling at the base of the tank (not condensation)
- The pressure relief valve dripping continuously
- Discoloured or rusty water from the hot tap
- Loud banging, popping, or rumbling during heating cycles, which indicates sediment buildup stressing the tank
If you smell gas, do not attempt any troubleshooting. Leave the area, avoid switching any electrical devices on or off, and call your gas supplier or a licensed gas fitter immediately. You can find more detail on responding to gas leak emergencies and what to do before help arrives.
Routine maintenance to prevent problems
The best Rheem heater troubleshooting guide is the one you never need to use. Most common water heater problems are preventable with a simple annual maintenance routine.
- Flush the tank once a year. Sediment accumulates from minerals in your water supply. Left unchecked, it shortens the lifespan of heating elements and burners by trapping heat at the tank base. Annual flushing keeps the unit running efficiently.
- Inspect the anode rod every two to three years. The anode rod is a sacrificial metal rod inside the tank that prevents internal corrosion. When it is depleted, the tank itself starts to corrode. Replacing it is inexpensive and adds years to your heater’s life.
- Test the pressure relief valve annually. Lift the lever briefly to confirm it opens and releases water, then closes cleanly. A valve that drips after testing or fails to open needs replacing. Learn more about locating and testing your pressure relief valve safely.
- Check for early corrosion. Look at the inlet and outlet connections, the base of the tank, and the anode rod port for any rust staining or white mineral deposits. Catching corrosion early is the difference between a cheap fix and a full replacement.
- Consider your water quality. Hard water accelerates sediment buildup and anode rod depletion. If you are in an area with high mineral content, flushing twice a year is worth considering. A whole-home water filtration system can also reduce the strain on your hot water unit significantly.
For a broader view of keeping your plumbing in good shape, our home plumbing maintenance checklist covers everything from taps and drains to hot water systems.
Pro Tip: Schedule your annual hot water heater maintenance in autumn. The unit has just worked through summer and is about to head into the higher-demand winter months. It is the ideal time to catch any wear before it becomes a cold-morning crisis.
Repair or replace: how to decide
At some point, troubleshooting tips are not enough. You need to weigh whether a repair is worth the cost or whether replacement makes more sense.
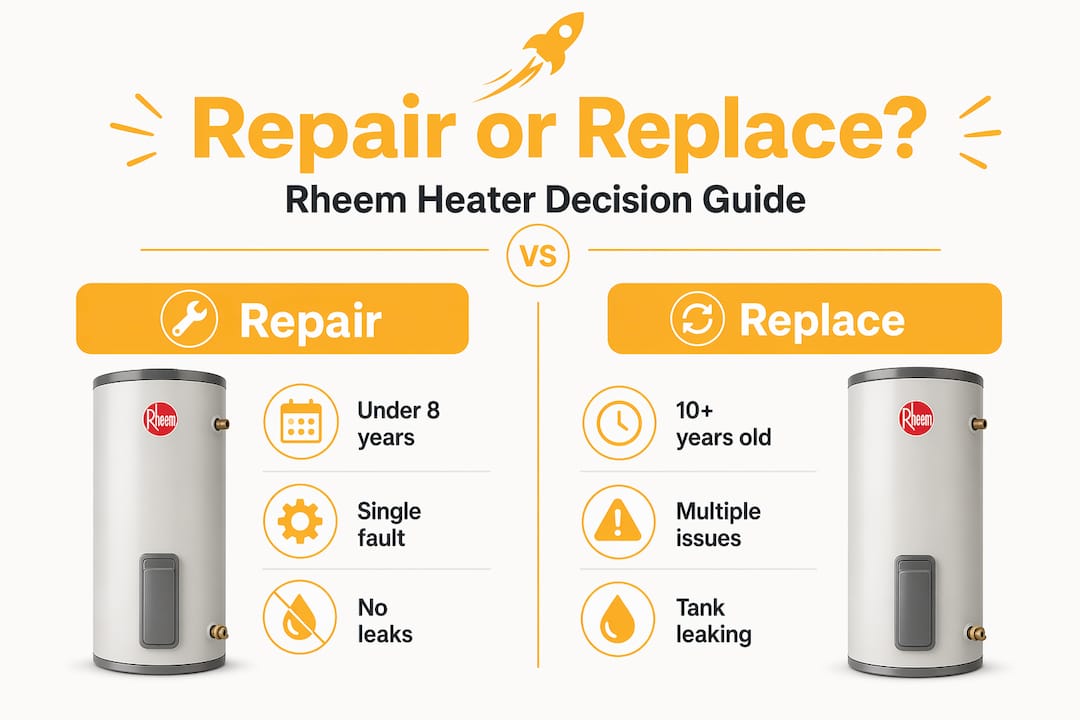
Conventional tank water heaters last approximately 10 years before replacement is recommended. As a unit approaches or passes that age, the risk of sudden failure and the cost of ongoing repairs both climb sharply. Proactive replacement planning reduces emergency costs and the risk of water damage from a failed tank.
| Factor | Repair | Replace |
|---|---|---|
| Unit age | Under 8 years | 10 years or older |
| Fault type | Single element, thermostat, pilot | Rusted tank, persistent leaks, multiple failures |
| Repair cost | Under 30% of replacement cost | Over 50% of replacement cost |
| Energy efficiency | Acceptable running costs | High bills despite repairs |
| Safety | No gas or structural concerns | Gas valve faults, tank corrosion |
If your Rheem unit is showing signs of irreparable damage, our guide on when to replace your hot water heater walks through the specific signals to watch for and what your replacement options look like.
My honest take on Rheem troubleshooting
I have seen homeowners spend hours on DIY fixes that were never going to work, and I have also seen people call a plumber for a tripped breaker. Both extremes cost money unnecessarily.
In my experience, the preparation step is where most people fall short. They skip photographing the unit, they do not check the model number, and they start pulling things apart without confirming whether the gas supply is actually on. That one oversight can turn a 20-minute fix into a two-hour job.
What I have learned from working with hot water systems over many years is that Rheem units are genuinely reliable. When they fail, it is almost always for a predictable reason: sediment, a worn element, a pilot that needs relighting, or a thermocouple that has reached the end of its life. None of those are mysteries if you follow the steps methodically.
The one area where I will always push homeowners to call a professional is anything involving gas. A fault 9 error code, a persistent gas smell, or a gas valve that is not responding correctly is not a DIY situation. The risk is simply not worth it.
Regular maintenance is the single biggest thing you can do to avoid ever needing this guide again. An annual flush and a two-yearly anode rod check will keep most Rheem units running well past the 10-year mark. I have seen well-maintained units last 15 years without a single major fault.
— Brent
Need a hand with your Rheem hot water system?
Sometimes the right move is picking up the phone. At Reactive Plumbing, Drains & Electrical, we handle everything from a straightforward Rheem water heater repair to full hot water system replacements across Sydney, Newcastle, Wollongong, Brisbane, and the Gold Coast.

Our licensed plumbers carry the parts and tools to diagnose and fix most Rheem hot water heater issues on the first visit. We also make sure every repair meets Australian plumbing standards, so you are not left with a code compliance issue down the track. Whether you need an emergency repair, a scheduled maintenance visit, or advice on whether to repair or replace, we are available 24/7. Explore our hot water system services or call us directly to book a time that suits you.
FAQ
Why is my Rheem hot water heater not producing hot water?
The most common causes are a tripped circuit breaker on electric models or an extinguished pilot light on gas models. Check your switchboard first, or follow the pilot relighting procedure and hold the reset button for 60 seconds.
What do Rheem water heater error codes mean?
Rheem water heater trouble codes indicate specific faults: ignition failure, flame loss, sensor faults, overheating, or gas valve issues. Codes like E1 and E2 are often DIY-resolvable, while E9 (gas valve fault) requires a licensed technician.
How often should I flush my Rheem hot water heater?
Flush your Rheem tank water heater at least once a year to remove sediment. In areas with hard water, twice-yearly flushing is worth considering to protect heating elements and maintain efficiency.
When should I call a plumber instead of troubleshooting myself?
Call a licensed plumber or gas fitter immediately if you smell gas, see water pooling at the tank base, notice rusty water, or if the unit displays a persistent fault code after basic resets. These are not DIY situations.
How long do Rheem hot water heaters last?
Most conventional Rheem tank water heaters last approximately 10 years. Units approaching this age with recurring faults are generally more cost-effective to replace than to continue repairing.